WooCommerce Hosted Payment Plugin Development

WooCommerce is a very popular e-commerce platform not just because it's easy to set up on top of any WordPress instance, it is also FREE. However, imagine setting up your digital shop, finishing up configuring your product catalog and inventory, only to find out that your local payment service providers do not offer direct integrations with WooCommerce and international payment service providers just isn't viable due to certain reasons such as exorbitant fees or geographical restrictions.
If it so happened that you also know how to develop WordPress plugins, then this guide is perfect for you.
What this guide is and what is it not
Different payment service providers offer different types of payment solutions. This guide is written specifically for Hosted Checkout or Redirect-based workflows and how to integrate it with WooCommerce.
While you can probably lift and apply most of the concepts and some of the code snippets from this guide to other types of payment solutions, this implementation is not a one-size-fits-all approach. Expect not the best of practices for developing plugins for the sake of simplicity, and that there can be better implementations out there aside from this one.
Our objective is to have a functional payment plugin at the end of this guide. We will try to cover and support other common features such as real-time order status updates based on payment status, voiding and refunding, as well as manual captures in upcoming posts.
Definition of Terms
Before we start writing any code, it's better to define some terms that will be used throughout this guide for clarity.
- WordPress Core - refers to the primary process that executes every time you navigate throughout a WordPress application, whether it is a web page or the administration dashboard. Remember that WordPress is just a PHP application after all, executed by the web server for every request it will receive.
- Hooks - are basically callback functions that extend the WordPress Core.
- Action Hooks - are callback functions that introduce side-effects to the WordPress Core. Side effects are workflows triggered after certain events during the execution of the WordPress Core. Side effects can be in the form of interactions with the database or showing certain views or information to the user on certain processes or workflows. Action hooks may accept parameters but do not provide any return value to the process or function that called it.
- Filter Hooks - are callback functions primarily used for transforming data within certain workflows during the execution of the WordPress Core. This is usually used for transforming data before being processed by WordPress Core or before being rendered as part of the UI that the user will see. Filter hooks may accept parameters and requires a return value to the process or function that called it.
- Payment Gateway - throughout this guide, we will refer to this as the actual integration point between your payment service provider and WooCommerce. Technically, this is where the logic of your payment plugin will be written and/or configured.
Start Writing Code
index.php, for the sake of simplicity.After the plugin header, first we want to write the following code:
if (!defined('ABSPATH')) {
	exit;
}
What this snippet does is to check the existence of a constant named ABSPATH. This is a global constant that WordPress usually sets in wp-config.php. If there is no value, the script just terminates. This is to prevent the plugin file to be accessed directly via browser should it be exposed directly from the file system. While it's totally optional, this is a good way to ensure that attackers cannot abuse your plugin directly.
Next, we define a callback function for the plugins_loaded action hook for registering our custom payment method to WooCommerce, then call the action hook immediately after.
function wc_my_custom_gateway_init() {

}

add_action('plugins_loaded', 'wc_my_custom_gateway_init');
Plugin Initalization
It is important to note that WooCommerce payment plugins are heavily dependent on the WooCommerce plugin itself, hence it needs to be loaded first before any payment plugin can be registered. In this sense, the following code snippets should be located within the callback function above to avoid errors.
Next, we define our payment gateway class and extend the WC_Payment_Gateway parent class from WooCommerce. We will focus on this class later on, so we can leave it empty for now.
class WC_My_Custom_Gateway extends WC_Payment_Gateway {

}After declaring our payment gateway class, we want to declare a function to register our payment gateway to WooCommerce and call it with the woocommerce_payment_gateways filter hook.
function add_my_custom_gateway($methods) {
	$methods[] = 'WC_My_Custom_Gateway';
    return $methods;
}

add_filter('woocommerce_payment_gateways', 'add_my_custom_gateway');
After writing all that, you should have the an index.php file with full content below:
<?php
/**
 * PHP version 7
 * Plugin Name: WooCommerce Custom Payment Gateway
 * Description: A sample WooCommerce custom payment gateway plugin
 * Author: Mico
 * Author URI: https://meeco.dev
 * Version: 1.0.0
 * Requires at least: 5.3.2
 * Tested up to: 6.0.2
 */


/**
 * This prevents direct access to the file; remember that WordPress
 * is just another PHP application served by a webserver, hence file
 * access through a browser is possible and can be abused by attackers.
 */
if (!defined('ABSPATH')) {
	exit;
}

/**
 * Action hook callback to initialize your payment plugin
 */
function wc_my_custom_gateway_init() {
	/**
	 * Your payment gateway class
	 */
	class WC_My_Custom_Gateway extends WC_Payment_Gateway {

	}

	/**
	 * Filter hook callback to register your custom payment gateway to
	 * valid WooCommerce Payment Gateways
	 */
	function add_my_custom_gateway($methods) {
		$methods[] = 'WC_My_Custom_Gateway';
		return $methods;
	}

	add_filter('woocommerce_payment_gateways', 'add_my_custom_gateway');
}

/**
 * Make sure to load your plugin after all other plugins are loaded
 * to make sure WooCommerce has already loaded so you can register
 * your payment plugin.
 */
add_action('plugins_loaded', 'wc_my_custom_gateway_init');index.php using the include_once directive. For example, you can move the payment gateway class to its own file instead of just declaring it within the plugins_loaded action hook callback function.Building the Payment Gateway Class
Extending the WC_Payment_Gateway class allows us to configure the behavior of our payment plugin. The first thing we need to do is define a public __construct() function and fill out the following properties we are extending from the parent class.
class WC_My_Custom_Gateway extends WC_Payment_Gateway {
public function __construct() {
$this->id = 'my_custom_gateway';
$this->method_title = 'My Custom Payment Gateway';
$this->method_description = 'Pay easily with my custom gateway';
$this->title = 'Your Payment Gateway';
}
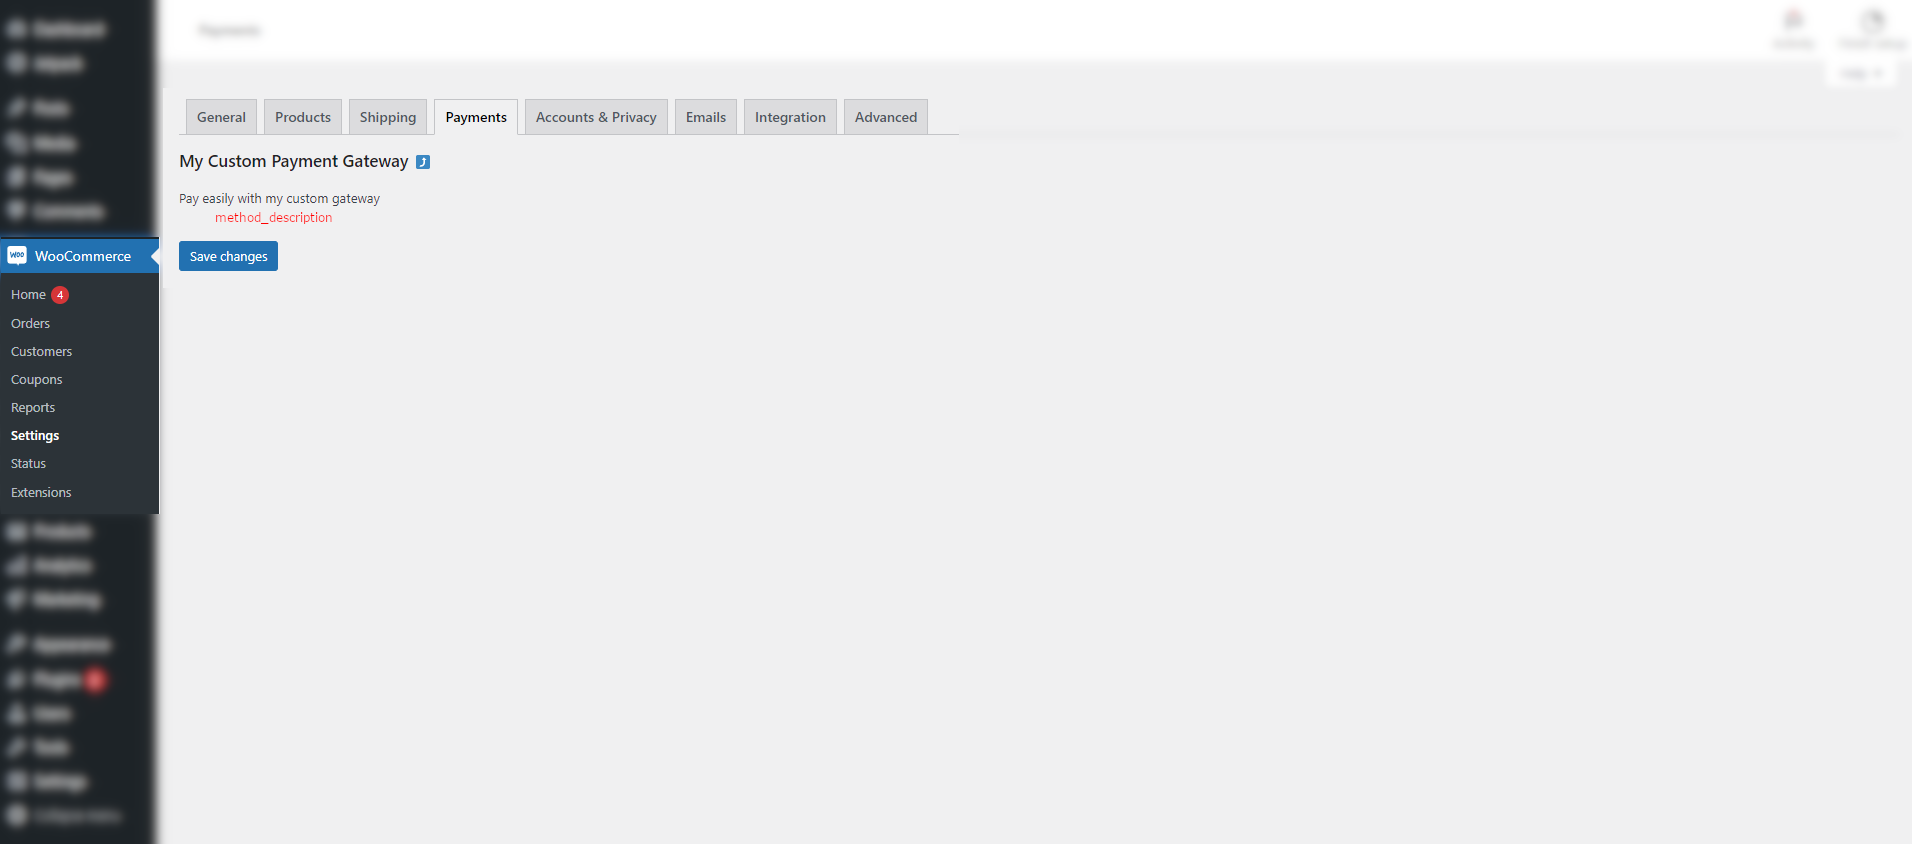
}refer to the screenshot below for clarity of the fields
- id [required] - unique gateway ID. Ideally no spaces nor special characters, and uses snake-case for readability.
- method_title [required] - the value for this is what is used to display the payment method in the payment method settings of WooCommerce.
- method_description [required] - the value for this is shown on the actual payment method settings page itself, describing what the payment method is.
- title [optional] - shown as part of the method_title in the payment method
If there are no errors, you should be able to see the following in its respective URLs:

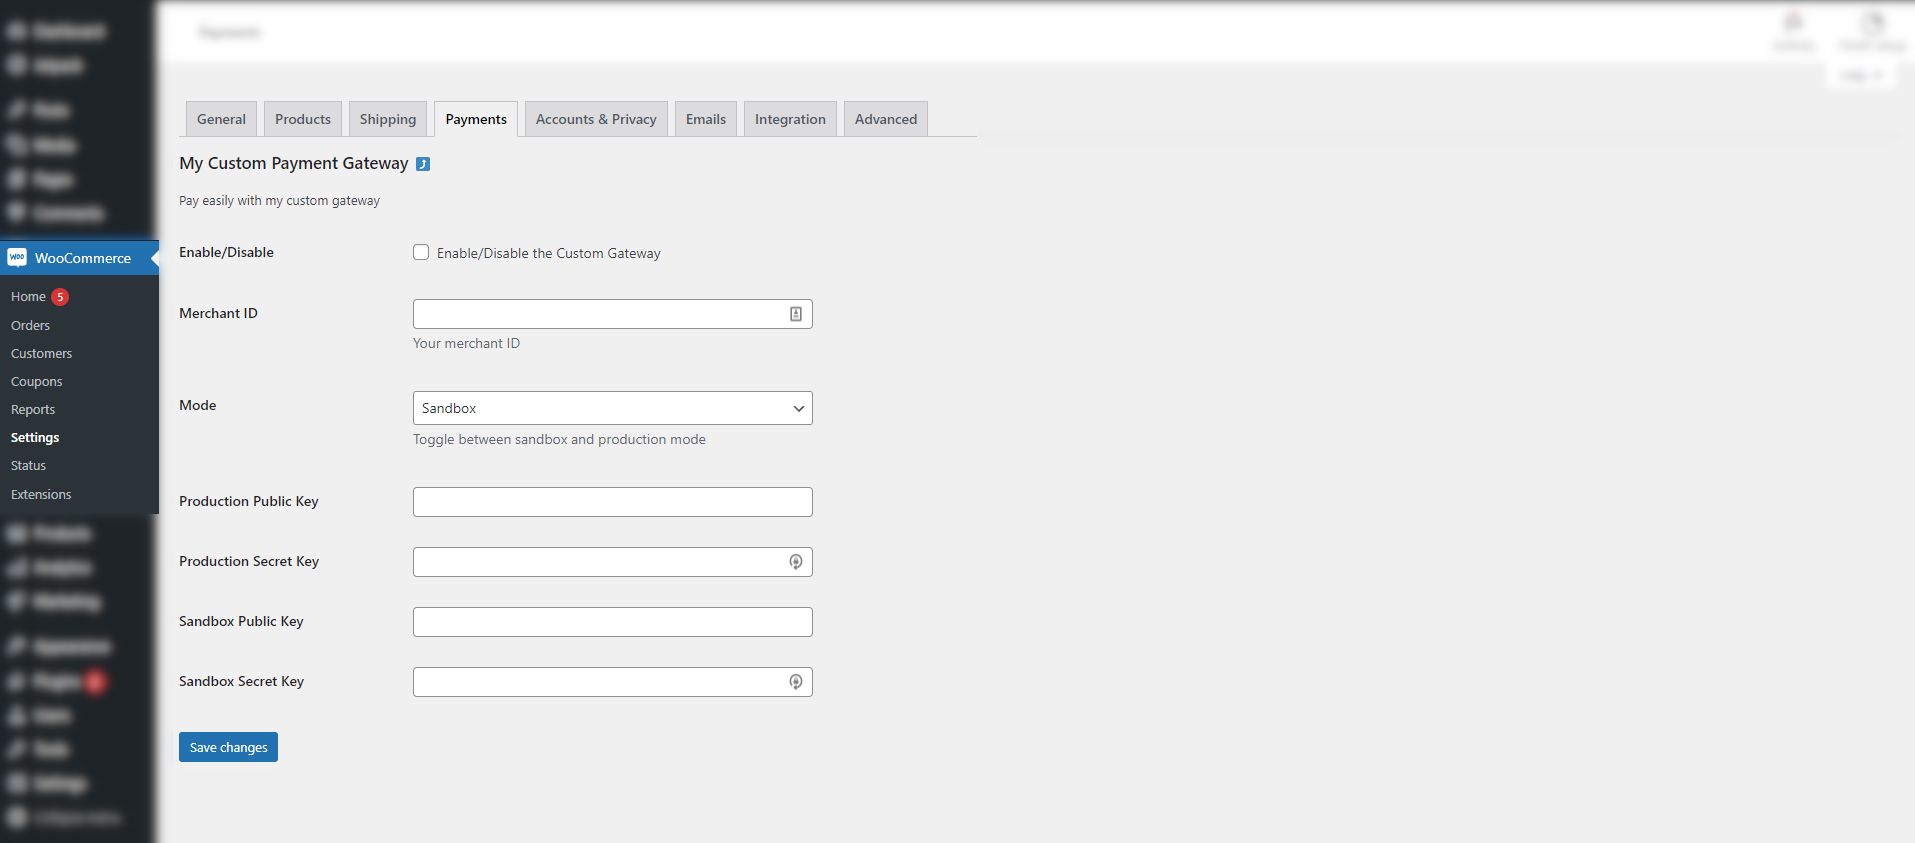
Adding Settings for your Plugin
Integrating with your chosen payment service probably requires your plugin users to input their credentials such as API keys, callback URLs, or other hosted checkout customizations. For this example, let's assume that we need to have the following fields for configuration:
- Merchant ID
- Mode Dropdown Toggle
- Sandbox Public API Key
- Sandbox Secret API Key
- Live Public API Key
- Live Secret API Key
Extending the WC_Payment_Gateway allows us to leverage the WordPress Settings API and enables us to create our own settings page. In your payment gateway class, you can do the following:
class WC_My_Custom_Gateway extends WC_Payment_Gateway {
    public function __construct() {
        $this->id = 'my_custom_gateway';
        $this->method_title = 'My Custom Payment Gateway';
        $this->method_description = 'Pay easily with my custom gateway';
        $this->title = 'Your Payment Gateway';

        $this->init_form_fields();
        $this->init_settings();

        add_action(
            'woocommerce_update_options_payment_gateways_' . $this->id,
            array($this, 'process_admin_options'),
        );
    }

    public function init_form_fields()
    {
        $this->form_fields = array(
            'enabled' => array(
                'title' => 'Enable/Disable',
                'label' => 'Enable/Disable the Custom Gateway',
                'type' => 'checkbox',
                'default' => 'no',
            ),
            'merchant_id' => array(
                'title' => 'Merchant ID',
                'type' => 'text',
                'description' => 'Your merchant ID',
            ),
            'mode' => array(
                'title' => 'Mode',
                'type' => 'select',
                'options' => array(
                    'sandbox' => 'Sandbox',
                    'production' => 'Production',
                ),
                'description' => 'Toggle between sandbox and production mode',
                'default' => 'sandbox',
            ),
            'production_public_key' => array(
                'title' => 'Production Public Key',
                'type' => 'text',
            ),
            'production_secret_key' => array(
                'title' => 'Production Secret Key',
                'type' => 'password',
            ),
            'sandbox_public_key' => array(
                'title' => 'Sandbox Public Key',
                'type' => 'text',
            ),
            'sandbox_secret_key' => array(
                'title' => 'Sandbox Secret Key',
                'type' => 'password',
            ),
        );
    }
}
First, declare a public method called init_form_fields() within your payment gateway class. Inside this public method, we will assign an array to the class property form_fields. This array will contain key-value pairs with each option key paired with another array value containing its configuration including but not limited to the title, type of the field, description, and even the default value. For all the available values and configurations per field type, check out the WooCommerce Settings API documentation.
Then, add the $this->init_form_fields() and $this->init_settings() call at the bottom part of the constructor. This will basically initialize all the values of the defined fields after the plugin has been registered.
Lastly, call the woocommerce_update_options_payment_gateways_{gateway_id} action hook with the method process_admin_options for the gateway to be able to save the settings.
At this point, if you don't encounter any errors, you will have the following screen below, complete with the functionality to save any data that you need to integrate with your payment service provider.
Also, if you enable your payment gateway at this point, you should be able to see it as a payment method option in the actual checkout page.
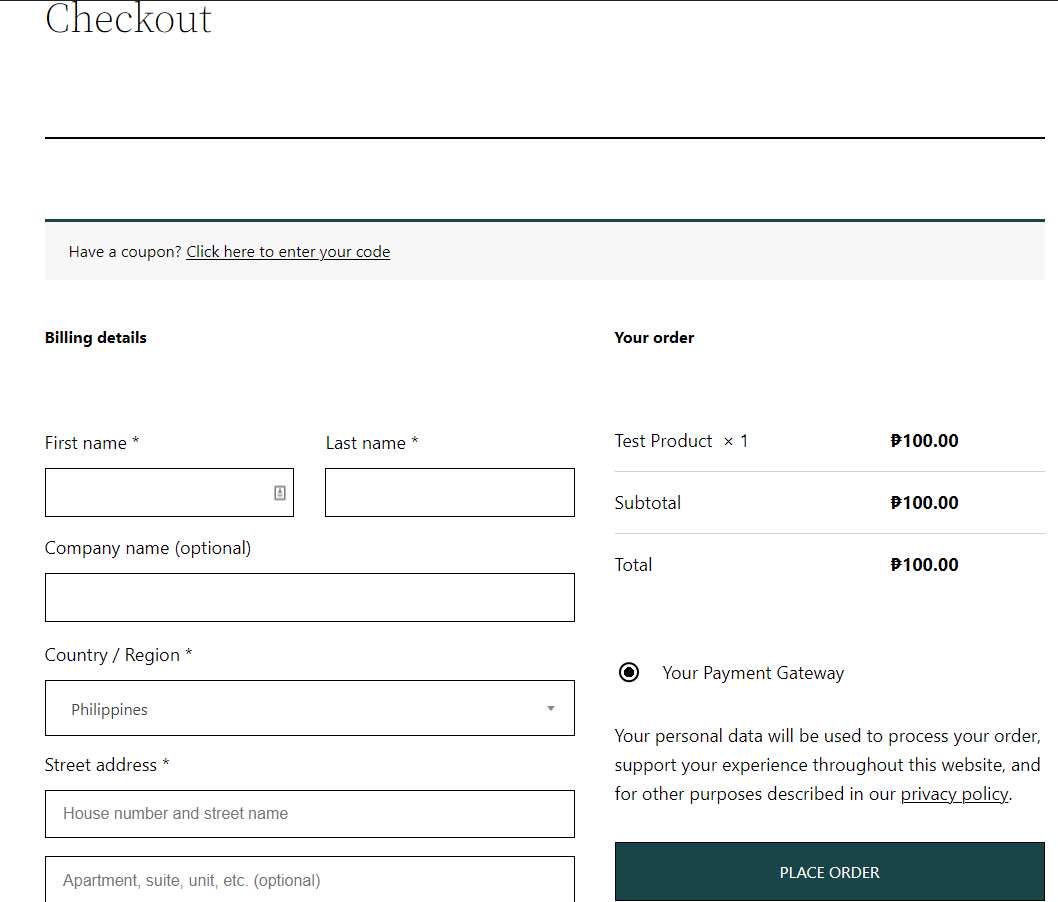
/checkout, otherwise you'll be seeing something similar to ?page=X where X is the page ID.Process the Actual Payment
For this section, we will set certain assumptions for the payment service provider, including data for endpoints, payload, and workflow.
- Assume that we need to send the payload below as a POST request to the
/checkoutendpoint of the payment service provider's public API to create a checkout.
{
	"first_name": "{customer_first_name}",
	"last_name": "{customer_last_name}",
	"total_amount": "{order_total_amount}",
	"redirect_url": "{redirect_url}",
}- Assume that we will receive the payload below after creating a checkout. This usually contains the hosted checkout URL where the customers can process their payments.
{
	"checkout_id": "chkout_fa21af237u3",
	"checkout_url": "https://your-payment-service-provider.com/hosted-checkout?id=chkout_fa21af237u3",
}- Assume that requests need to have an Authorization header with the base64-encoded secret key as value.
Now that we have the assumptions above, you can add make the following changes to your code:
class WC_My_Custom_Gateway extends WC_Payment_Gateway {
    protected $mode;
    protected $secret_key;

    public function __construct() {
        $this->id = 'my_custom_gateway';
        $this->method_title = 'My Custom Payment Gateway';
        $this->method_description = 'Pay easily with my custom gateway';
        $this->title = 'Your Payment Gateway';

        $this->init_form_fields();
        $this->init_settings();

        add_action(
            'woocommerce_update_options_payment_gateways_' . $this->id,
            array($this, 'process_admin_options'),
        );

		/**
         * This is a pretty nifty trick to set public/secret keys on your
         * gateway instance if you implement mode as a dropdown instead of
         * checkbox or radio group
         */
        $this->mode = $this->get_option('mode');
        $this->secret_key = $this->get_option($this->mode . '_secret_key');
    }

    /**
     * ASSUME THE FORM FIELDS SETTINGS IS HERE
     */

    public function process_payment($order_id)
    {
    	/** Get the actual order object via ID */
        $order = wc_get_order($order_id);

        $payload = json_encode(
            array(
                'first_name' => $order->get_billing_first_name(),
                'last_name' => $order->get_billing_last_name(),
                /** get_total() returns a string value so you need to convert */
                'total_amount' => floatval($order->get_total()),
                'redirect_url' => $order->get_checkout_order_received_url(),
            )
        );

        $request_args = array(
            'body' => $payload,
            'method' => 'POST',
            'headers' => array(
                'Authorization' => 'Basic ' . base64_encode($this->secret_key . ':'),
                'Content-Type' => 'application/json'
            )
        );

        $response = wp_remote_post('https://your-payment-service-provider.com/checkout', $request_args);

        $body = json_decode($response['body'], true);

        $order->add_meta_data($this->id . '_checkout_id', $body['checkout_id']);

        return array(
            'result' => 'success',
            'redirect' => $body['checkout_url'],
        );
    }
}
In the code above, the first thing we did was to add two protected properties in our payment gateway class: mode and secret_key. We also assigned values to them at the end of the __construct() function, retrieving their corresponding values from the settings page we created earlier.
Next, we defined a public function called process_payment, taking in one parameter, order_id. This is extended from the parent WC_Payment_Gateway class and this is where the actual integration normally happens. For hosted checkout workflows, this is where you usually construct the payload with all the customer and transaction details that will populate your hosted checkout page.
In our example, we retrieved all the details we need from the WooCommerce Order object, from customer name to total transaction amount and constructed the JSON payload. After that, we constructed the request arguments, including the Base64 encoded secret key for the authorization header.
Lastly, we sent the request to the public API of the payment service provider using the indicated endpoint and wp_remote_post() function from WordPress. Assuming it was a successful attempt, all we need to is to decode the JSON response payload, associate the checkout ID to the order metadata – which is critical if you want to resolve order statuses in real-time with payment statuses, then returned an array with the result and redirect keys, the latter set to whatever the value of the checkout URL from the response payload is.
Final step
If you're integrating with an actual payment service provider, all that's needed now is to test. If you have followed everything so far, you should be able to place an order in your e-commerce website using your custom payment gateway as the payment method, get redirect to the hosted checkout page, process your payment, and get redirected back to your e-commerce website.
What's Next?
At this point, there are several other features that you probably need/want to develop to have a better workflow:
- If your payment service provider's public API offers registration a notification mechanism for payment statuses – usually in the form of webhooks – you may want to implement handling webhooks using the WooCommerce API Callback or even WordPress Custom Endpoints, instead of just pinging back other API endpoints to check the payment status.
- If your payment service provider supports voiding and refunding, you probably want to implent the
process_refund()method from theWC_Payment_Gatewayparent class. - Manual capture is a bit more tricky as this requires extending the admin dashboard user interface to provide for the manual capture functionality. I am reserving this to explain in detail for another technical post.